Have you ever experienced the gut-wrenching feeling of losing a project’s hard work? A couple of years ago, I lost an entire website due to a server crash, which ignited my passion for ensuring data safety. This experience led me to explore various ways to backup websites, and today, I want to share vital insights into backing up your website using cPanel. Let’s dive into this essential aspect of website management!
Table of Contents
ToggleUnderstanding the Importance of Website Backups
When I think about the digital world we live in, I can’t help but feel a sense of urgency about one crucial aspect: website backups. They might seem like a hassle, but trust me, they are essential. Imagine waking up one day to find your website has vanished. It sounds like a nightmare, right? Yet, this scenario is more common than you think.
Data Loss Scenarios
Data loss can happen in various ways. Here are a few scenarios that might hit close to home:
- Accidents: A simple mistake, like accidentally deleting files, can lead to significant data loss.
- Hacks: Cyberattacks are on the rise. Hackers can infiltrate your site and corrupt or steal your data.
- Server Failures: Sometimes, the problem is out of your control. Server issues can lead to unexpected downtime.
These situations can be devastating. Did you know that 60% of small businesses that lose their data will shut down within six months? That’s a staggering statistic! And it’s not just businesses; around 30% of people have experienced some form of data loss. It’s a reality we all need to prepare for.
How Backups Save Your Content
So, how do backups actually help? Let’s break it down:
- Content Preservation: Backups store your website’s data. If something goes wrong, you can quickly restore your site to its previous state.
- Functionality Restoration: If your site is hacked or crashes, backups allow you to bring it back online without losing your hard work.
Think of backups as your website’s safety net. They catch you when you fall. Without them, you might find yourself scrambling to recover lost content, which can be both time-consuming and stressful.
Peace of Mind
Knowing that your information is secure brings peace of mind. It’s like having insurance for your digital presence. You can focus on creating content and engaging with your audience, rather than worrying about what might happen if something goes wrong.
Imagine this: You’ve spent hours crafting the perfect blog post. You hit “publish,” and then—bam! Your website crashes. Without a backup, all that hard work could be gone in an instant. But with a backup, you can restore your site and get back to business.
Personal Stories of Data Recovery
Let me share a quick story. A friend of mine once lost her entire website due to a server failure. She was devastated. All her content, her hard work—it was gone. Luckily, she had a backup. Within a few hours, she was able to restore her site. It was a close call, and it taught her the importance of regular backups.
Her experience is not unique. Many people have similar stories. They learn the hard way that data loss can happen to anyone. It’s a lesson I hope we can all avoid.
Final Thoughts
In the end, the question remains: Why take the risk? Backing up your website is not just a good idea; it’s a necessity. As the saying goes,
“The best time to back up your data was yesterday. The second-best time is now.” – Anonymous
Don’t wait until it’s too late. Take action today to protect your valuable content.
Website backups are super important. You never know if something is going to happen to your website that would cause you to lose data. So, let’s prioritize backups and ensure our digital presence remains secure.
Setting Up Backup Options in cPanel
Backing up your website is crucial. You never know when disaster might strike. Whether it’s a server failure, a malicious attack, or even accidental deletion, having a backup can save you a lot of hassle. Today, I’ll guide you through the cPanel interface and show you how to set up backups effectively.
Overview of cPanel Interface and Backup Features
First things first, let’s familiarize ourselves with the cPanel interface. When you log into cPanel, you’ll see a dashboard filled with various icons. Each icon represents a different feature. The backup options are usually found under the “Files” section.
In cPanel, you have several backup options:
- Full Backups: This option allows you to back up your entire website, including files, databases, and email accounts.
- Partial Backups: You can choose to back up specific parts of your site, like just the databases or just the files.
- Automated Backups: With tools like CodeGuard, you can set up automatic backups to ensure your data is always safe.
As you can see, cPanel makes it easy to manage your backups. But how do you actually perform a backup? Let’s dive into the step-by-step process.
Step-by-Step Instructions for Full Backups
Here’s how to create a full backup in cPanel:
- Log into your cPanel account. This is usually done by going to yourdomain.com/cpanel.
- Navigate to the “Files” section. Look for the “Backup” icon and click on it.
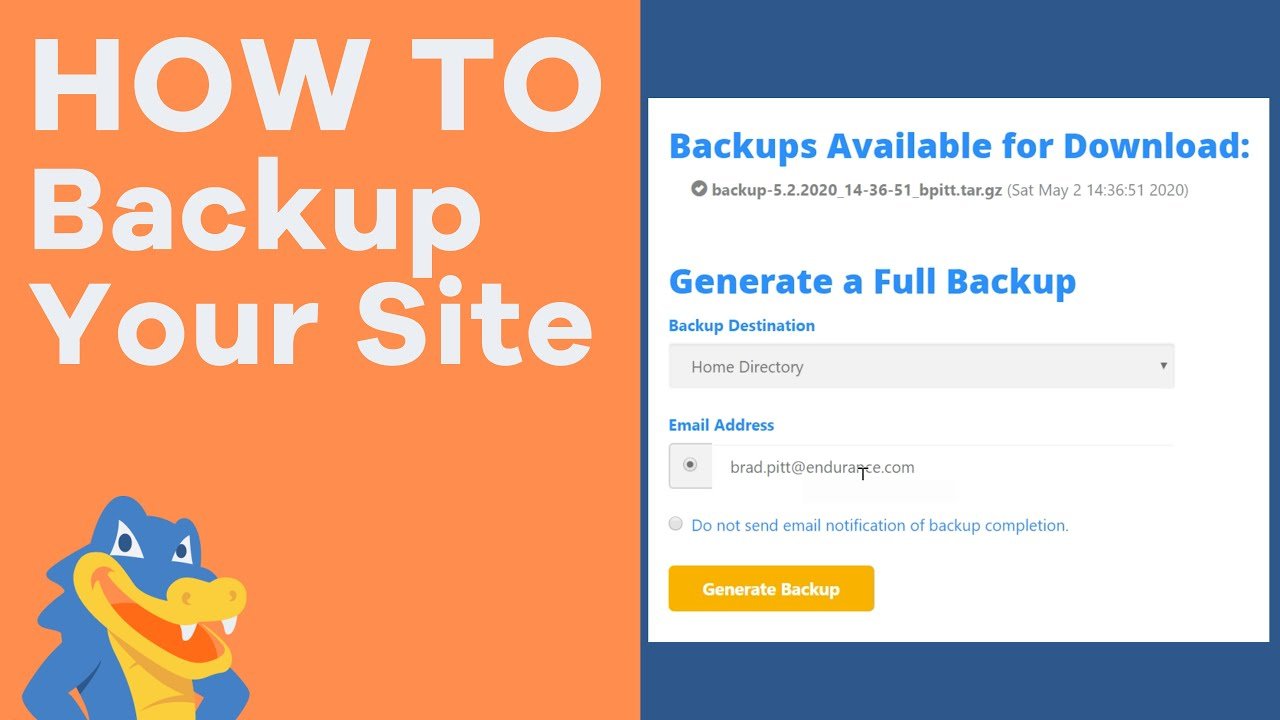
- Click on “Download a Full Website Backup.” This will start the process of creating a backup of your entire site.
- Select the backup destination. You can choose to save the backup to your home directory or send it to an email address.
- Click “Generate Backup.” The backup process will begin. Depending on the size of your website, this may take some time.
- Once the backup is complete, you’ll receive a notification. If you chose to save it to your home directory, you can download it from there.
And that’s it! You’ve successfully created a full backup of your website. Remember, it’s a good practice to back up your site regularly. But what if you want to automate this process?
How to Set Up Automated Backups Using CodeGuard
Automating your backups can save you time and ensure that your data is always protected. CodeGuard is a popular tool that integrates with cPanel to provide automated backups. Here’s how to set it up:
- Log into your cPanel account.
- Find the CodeGuard icon. If you don’t see it, you may need to install it from the cPanel marketplace.
- Click on the CodeGuard icon. You’ll be taken to the CodeGuard dashboard.
- Set up your backup schedule. You can choose how often you want backups to occur—daily, weekly, or monthly.
- Enter your website details. CodeGuard will need access to your site to create backups.
- Save your settings. CodeGuard will now automatically back up your website according to the schedule you set.
With CodeGuard, you can rest easy knowing your website is being backed up regularly.
“With cPanel, backing up your website becomes an effortless task.” – Hosting Expert
In conclusion, setting up backup options in cPanel is straightforward. Whether you choose to do it manually or automate the process with CodeGuard, you’re taking a vital step in protecting your website. Remember, a backup is your safety net in the digital world.
Restoring Your Website from Backups – A Safety Net
When it comes to managing a website, backups are crucial. But what happens when you need to restore your website? This process can be daunting, especially if you’re not familiar with it. Don’t worry! I’m here to guide you through the steps of restoring your website from backups. Let’s dive in.
Detailed Instructions for Restoring Backups
Restoring a website from a backup can vary depending on your hosting provider and the tools you use. However, I’ll outline a general process that you can follow:
- Access Your Hosting Control Panel: Log in to your hosting account. Most providers use cPanel, which is user-friendly.
- Locate the Backup Section: In cPanel, find the “Backup” or “Backup Wizard” option. This is where you can manage your backups.
- Select Restore: Choose the restore option. You may have options for full or partial restores.
- Upload Your Backup File: If you have a backup file saved locally, upload it. If your backup is stored on the server, select it from the list.
- Confirm the Restore: Review the details and confirm the restoration process. This step is crucial, as it will overwrite your current website data.
- Check Your Website: Once the restoration is complete, visit your website to ensure everything is functioning correctly.
Following these steps can help you restore your website efficiently. But, there are some insider tips that can make the process even smoother.
Insider Tips for Quick Recovery
Here are some tips that I’ve found helpful when restoring backups:
- Keep Multiple Backups: Always have more than one backup. This way, if one fails, you have alternatives.
- Test Your Backups: Regularly test your backups to ensure they work. It’s like checking your parachute before jumping!
- Document the Process: Keep a record of the steps you take during restoration. This documentation can save you time in the future.
- Use a Staging Environment: If possible, restore your backup in a staging environment first. This allows you to test everything before going live.
By following these tips, you can minimize downtime and ensure a smoother recovery process.
Understanding the Difference Between Full and Partial Restores
Before you restore your website, it’s important to understand the difference between full and partial restores:
- Full Restore: This option restores everything—files, databases, and settings. It’s useful when your entire website is compromised.
- Partial Restore: This option allows you to restore specific parts of your website, such as only the database or certain files. This is handy if you only need to recover a small section.
Choosing the right restore option can save you time and effort. It’s like choosing the right tool for the job—using a hammer for nails and a screwdriver for screws.
Common Issues Faced During the Restore Process
Even with the best preparation, issues can arise during the restore process. Here are some common problems:
- Corrupted Backup Files: Sometimes, backup files can become corrupted. Always verify the integrity of your backups.
- Incompatibility Issues: If your website has been updated since the backup was created, you might face compatibility issues.
- Missing Files: Ensure that all necessary files are included in your backup. Missing files can lead to a broken website.
Being aware of these issues can help you troubleshoot effectively if they arise.
Best Practices to Avoid Data Loss in the Future
To prevent data loss in the future, consider these best practices:
- Schedule Regular Backups: Automate your backup process to ensure it happens regularly without you having to remember.
- Use Reliable Backup Solutions: Invest in reputable backup solutions that offer comprehensive features.
- Educate Yourself: Stay informed about backup and restore processes. Knowledge is power!
As the saying goes, “It’s not just about backing up; it’s about restoring effectively too.” – Web Developer. This quote emphasizes the importance of not just having backups, but knowing how to restore them properly.
In conclusion, restoring your website from backups is a critical skill for any website owner. By following the steps outlined above, utilizing insider tips, and understanding the differences between restore options, you can navigate this process with confidence. Remember to keep backups updated and test them regularly to avoid future headaches. Your website is your digital presence, and protecting it should always be a priority.
TL;DR: Backing up your website is crucial for data safety. This guide walks you through how to easily backup your website using cPanel, ensuring you never lose precious data again.